-If I press the button D12, I read the value of the potentiometer A0.
-If I press the button D8, I read the value of the potentiometer A1.
-If I press the button D7, I read the value of the temperature.
-If I press the button D4, I change the value of a LED.
To do it, we will use the shield of MSE Bilbao. In this picture we can see the shield with the names of the parts that we will use:
In LabVIEW, we will create an VI like this. On the right side we can see a picture of the shield, the actions of the buttons and a button that when you press it, it appears a pop-up that tells the instructions of the program. On the left side of the VI we can see a button to stop the program an the value measured.
If we click D4, the LED will be switched ON and if we click it again, it will be switched OFF.
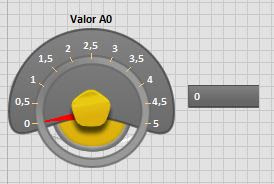
If we press D12 or D8, the LED will disappear and we will see a potentiometer on the screen like this, with the measure of the potentiometer that we are measuring:
If we press D7, we will measure the LM35 of the shield and we will measure the temperature of the room. On the screen, we will see this picture:
On the other side, in the code, we have this:
Here, we can see the inputs of the program (instructions, stop and the pins A0, A1 and A4). We also can see the outputs of the screen (the LED, the highest temperature measured and the lowest temperature measured). On the right, we hide the parts that we don't want to see in the program and we initialize the outputs and inputs of the Arduino.
In this other part of the program, we can see a code to select the operation that we want to do in the program and the code that it does.
You can download the program using this link:


No hay comentarios:
Publicar un comentario